The Bra
I'll continue the saga of searching for the perfect fit where I left off in my last post. Since making my last bra, the one with cream satin and bra wadding, I realised that my attempt at getting the wires to sit flush against my chest wall was a failure. I made the bridge narrower for that bra, and swivelled the wires towards the centre front by taking out a triangle at the centre front. This coupled with the height of the wires at the centre makes this bra a little uncomfortable. Still better than a RTW bra, but still a little uncomfortable.
In an attempt to solve this problem once and for all, I made up a version of the cradle pattern out of cardboard, split at the centre front so that it can be swivelled around until it fits perfectly. What I came up with was actually the opposite of what I tried last time. I now have a bridge that is almost as wide as the first few bras that I made, and it is swivelled more to the sides (ie I have added a triangle into the centre front, in addition to what I took away last time).

I re-drew the pattern piece for the cradle, re-shaping the centre front curve, and re-doing the angle of the side seam to match up with the original pattern block for this version.
The other major alteration that I made for this bra was to shorten the wire at the centre by 1cm. Since changing to a larger wire, I have found that the wire is uncomfortably high, especially if the wires are closer together at centre front. That's hardly surprising seeing as how I am normally a B cup, and I've gone up to using a D wire. My cup volume hasn't changed, and if I put on a RTW 12D bra, it would no doubt swim on me! Isn't it great how we can mix and match different sized components to get the best fit possible in our bras?
To make this last change, I firstly lowered the cradle pattern, and took off 1cm of the upper cup piece to match, and of course, cutting 1cm from the length of the wires. This is the second time that I have shortened wires, but the first time I've meant to do it from the start. (The first time I did it was on this bra.) Maddy has a great tutorial on cutting wires down if you aren't sure how to do it yourself. This is pretty much the same way that I do it.

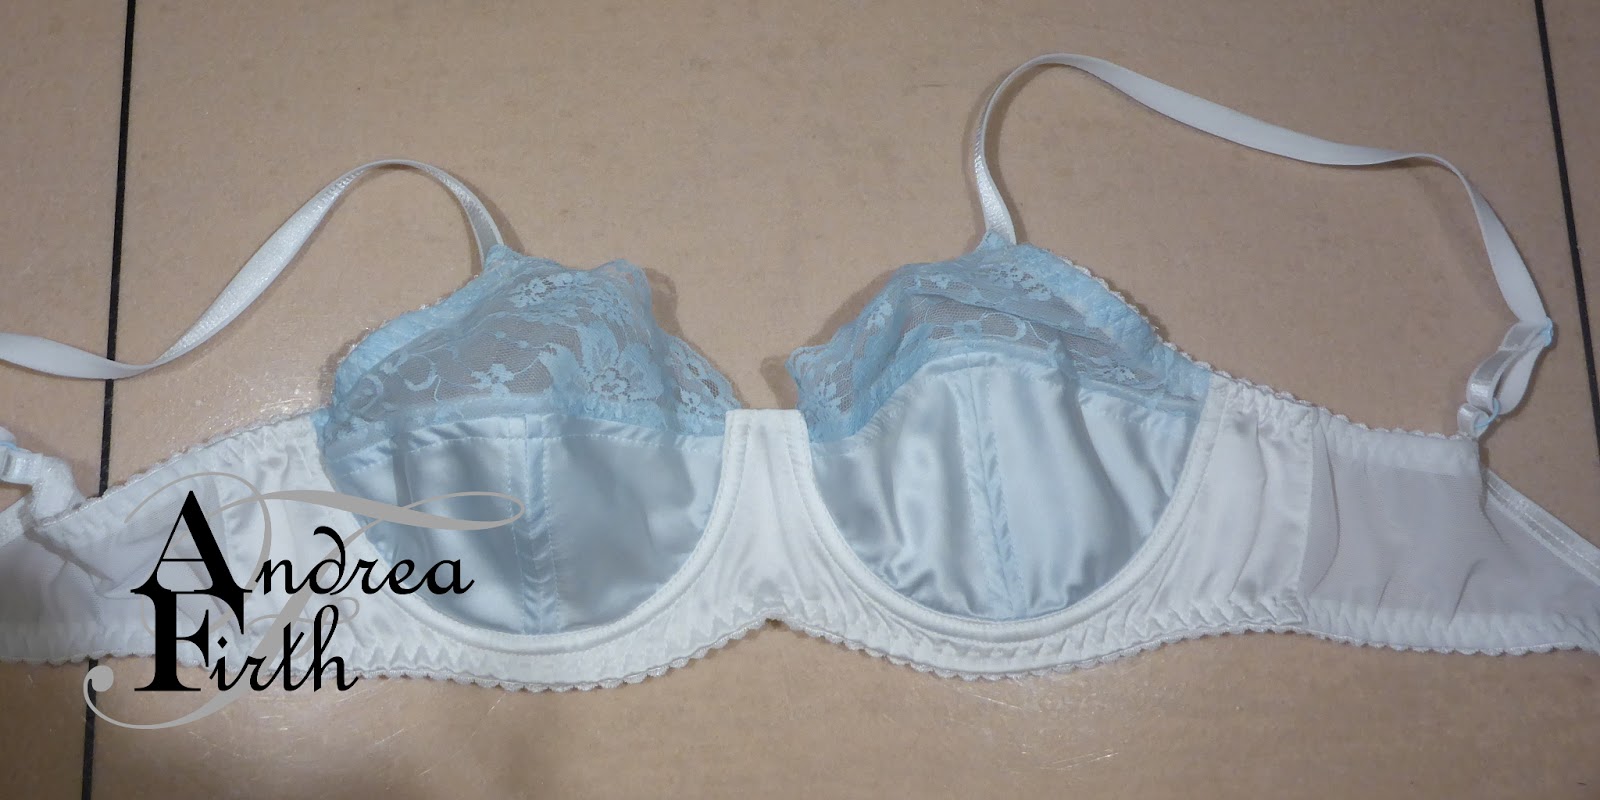
As I rummaged through my supplies looking for likely supplies for this bra, I came across some lace that I had dyed blue. I decided to use this for the upper cups. I had some matching dyed satin, strap elastic, and rings and sliders, but decided to leave the strap elastic for the next blue and white bra. The piece of satin that I dyed was too narrow to make the cradle out of, so I opted to use the dyed satin for the lower cups, and plain white satin for the cradle. For everything else I used my white supplies.
 |
| Blue rings and sliders! |
Costing
Interfacing, satin and lace - stash / gift
Tricot; Powernet; Underwires; Underwire casing; Elastic; Strap elastic; Rings and Sliders; Hook and eye closure; Thread; Dye
Total Cost $5.71

Fit
Unless I had a 2 dimensional rib cage, I don't think that I'm ever going to get a 100% perfect fit. But the fit of the cradle in this bra is getting pretty close to that. I did add a little extra width at the top of the cups since my last bra, but it actually seems a little tight still, so I might add just a smidge more, by cutting and spreading, on the next one, say an extra 5mm.
I also seem to have a little excess fabric in the lower cups. I can ease the cups in, but the fabric in the cups is puckering. If you look closely, you can see the same thing in my blue duchess satin bra, cream bra, and this one. I think it's time to bite the bullet and take out a few millimetres from the lower edge of the lower cups.

I also seem to have a little excess fabric in the lower cups. I can ease the cups in, but the fabric in the cups is puckering. If you look closely, you can see the same thing in my blue duchess satin bra, cream bra, and this one. I think it's time to bite the bullet and take out a few millimetres from the lower edge of the lower cups.

I find that I can't really tell how a pattern fits until I've tried it out with bra wadding. With a lace or fabric cup such as this, I find that the bra moulds to your shape, but with bra wadding added, the bra tries to mould you to fit.
I think I know what I'll try out next, and it will feature bra wadding again, then maybe I can cut into the really nice laces that I've been collecting recently.
I think I know what I'll try out next, and it will feature bra wadding again, then maybe I can cut into the really nice laces that I've been collecting recently.
You really are working hard to figure out how to make these - they certainly look superb - an in due course feel superb as well.
ReplyDeleteIt's a never ending quest. Imagine if I did find the perfect fit! I can't imagine using the exact same pattern more than once.
DeleteAbsolutely beautiful! That's a great idea to dye the white rings and sliders to match, always the hardest bit to colour-match :)
ReplyDeleteThank you Carolyn. If only I could find the right size rings and sliders for my ever growing stash of strap elastic!
DeleteThis has turned out so pretty and the blue and white combination is very fresh. So is the bridge sitting where it should?
ReplyDeleteThanks Sharon, I'm pretty happy with it! I think the bridge is pretty close to being in the right spot now. I think I'll call that bit done!
DeleteExcellent now to get working on mine.
Delete