
I also found two free thong / G-String patterns that I thought I'd try out as well. I don't actually wear a G-string, but in the spirit of trying out new patterns, and hosting lingerie this month, I thought I'd take one for the team and make a sample of each.

Firstly though, on to the drafting tutorial from Timelace Studio.
A word of warning before you start. You need to be very accurate with your measurements to get the best result from your pattern. To take an accurate waist to crotch measurement, sit on a flat chair and measure up from the chair to your waist which you will have tied something around, as per the instructions. For every centimetre that you are out with your measurements, it makes 2cm of difference to the finished pattern. You will end up with a pattern with either a really long, or much too short crotch. Ask me how I know.
Once you have your correct measurements, the drafting of this pattern is pretty straightforward. The instructions suggest different percentages of your waist and hip measurement to make the pattern depending on the stretch of your fabric. The photos below are of my second attempt at the pattern, after I'd rechecked my measurements. For the first try I drafted the pattern at 85%, 90%, 95% and 100% of measurements. The 85% was larger than my existing pattern, so I went with that. The pattern still turned out too large (firstly due to an error in my crotch to waist measurement), but it was also too large overall. So, for attempt #2, I nested patterns (for future reference) with 80%, 90% and 100%. I could probably do another at 70% for extra stretchy fabrics, but I wanted to try this one out first and make any necessary adjustments before I got too carried away.

I cut a pair of undies straight from the completed pattern draft, then adjusted the pattern with a (much) lower waistline. I haven't done much more in terms of alterations to this pattern, and they fit great, so overall, I declare this pattern drafting a success! I'm ditching the old pattern and using this as my basis for all future undies.

Now onto the two G-string patterns. I used the same elastic and blue jersey fabric as the undies, but added stretch lace over the top.
Free pattern from Madalynne
This pattern is downloadable from the bottom of the above blog post from Maddie, and is found in the last paragraph under the heading Resources. It was drafted by one of her friends, based on a rub off of a RTW pattern. I downloaded the Medium size. I'm not sure if it's just my printer, but my version printed out rather small. Luckily, Maddie provides the centre front lengths of each of the pattern pieces, so, if like me, your pieces don't print right, you can do some simple calculations and enlarge the pieces to the correct size. I just enlarged mine to 160%, and it was close enough for me. The gusset piece wasn't the exact same proportion to the others though, and even if it was, the edge that joins to the front was a little wide, so I slimmed it down a little to fit.

I also followed Maddie's example and joined the gusset to the front for the outer layer, and cut a separate gusset for the lining.

The verdict? They're a little wide around the leg, so I have to pull them up over my hip to stay up, but otherwise, they seem to fit really well. Will I wear them though? That remains to be seen (or not, you know, cause I'll have clothes on over the top). If I was to make more, this would be my go-to pattern.
Fehr trade Lacy Thong
Based on my measurements, I made the medium of this pattern also. As I used an all-over lace and not one with a scalloped edge, I added elastic allowance to the lower edge of the leg pieces before starting. It all went together pretty easily. I added elastic to the lower legs before adding the leg pieces to the front and back.
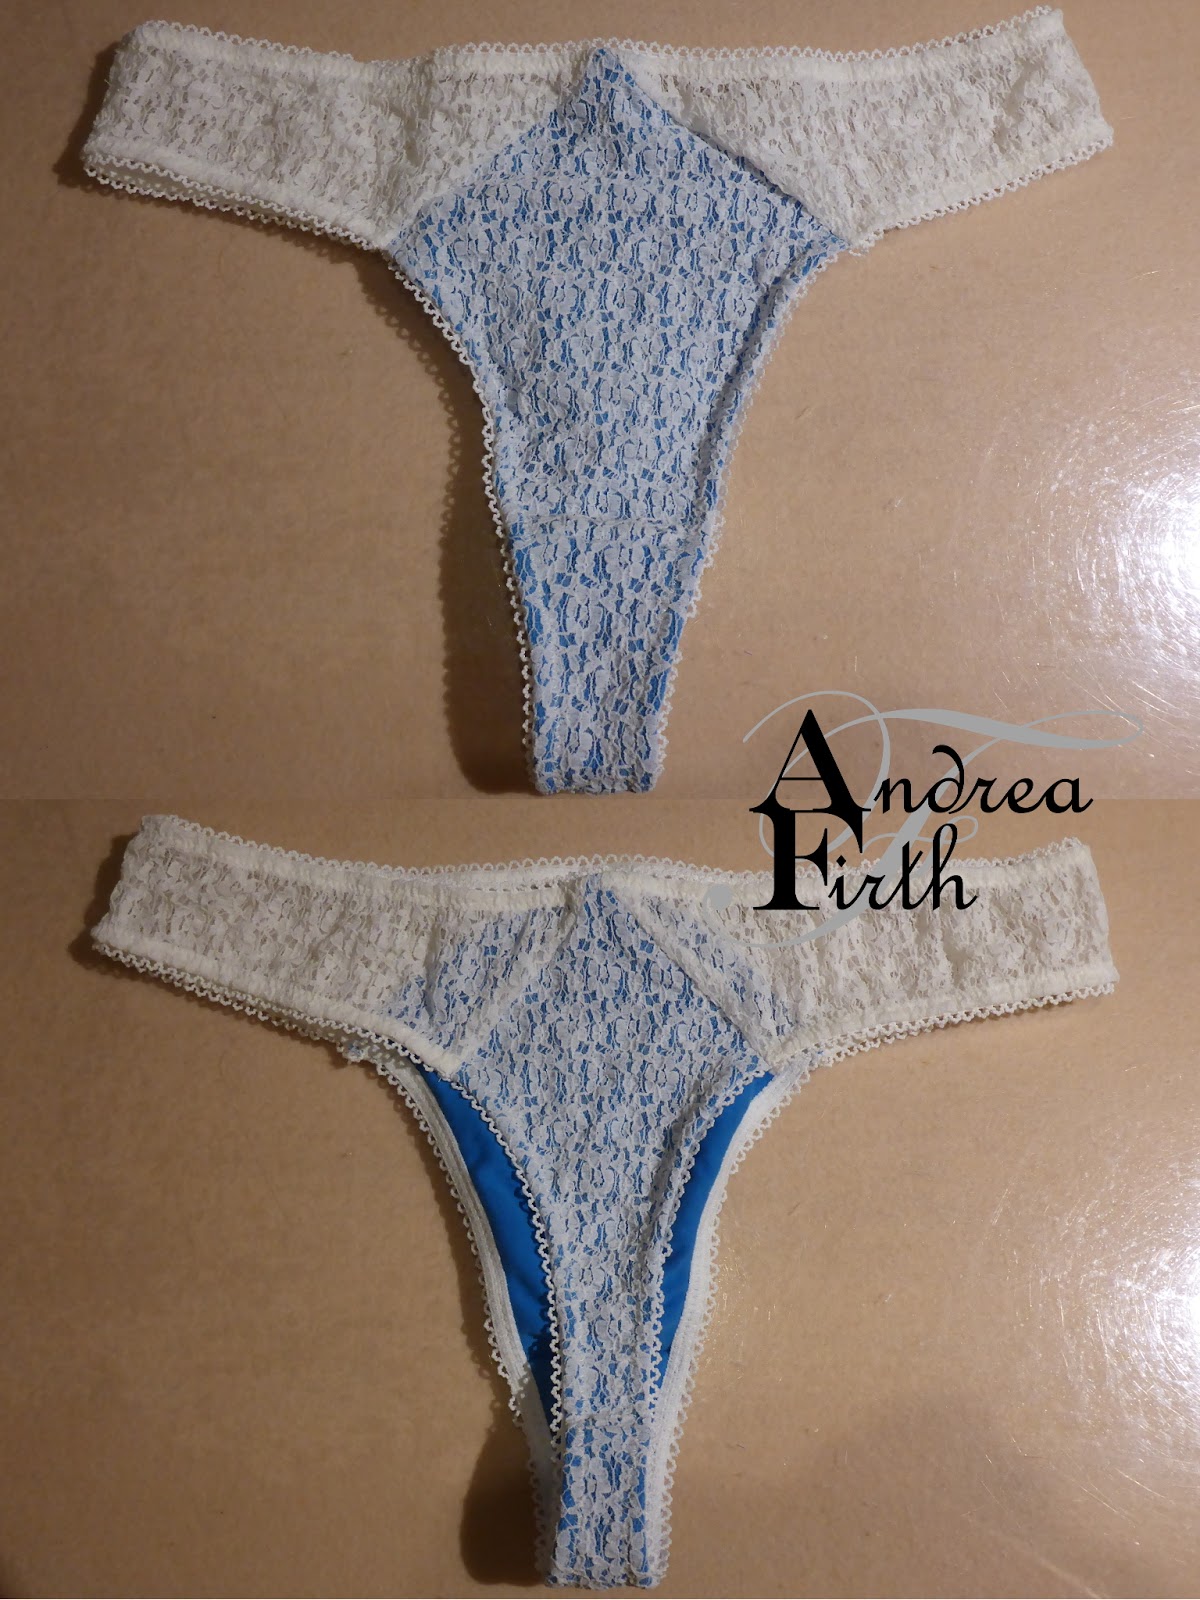
It was only after I'd finished them that I realised that the pattern piece for the crotch didn't line up with the front. If you butt the edges together they are the same width,

but if you overlap to allow for seam allowance, there's a difference of a few millimetres.

But onto how they actually fit. The waist is a little high for my liking, and the crotch is too narrow. Maddie's pattern has a much more comfortable width, and when the two are compared, the Fehr Trade pattern is about 14mm narrower. Just narrow enough to be uncomfortable in my opinion. If I were to make these again, I would be altering the crotch by widening from the bottom of the front piece by 7mm on each side, keeping this width to the centre of the crotch then tapering in to the end of the crotch piece.

I love the look of these with the lace over the jersey, and now I want an underwear drawer full of blue undies covered in white lace.
If you're looking for other free lingerie patterns, there's the Ruby slip by pattern scissors cloth, the Tanga knicker pattern on Burdastyle,and Madalynne has the Amerson undies and two free bralette patterns, the Sierra and another one called (I think) Mallory Lane? Also, cloth habit has a pattern for boy leg undies, "Rosy Ladyshorts"
ReplyDeleteI've actually just made a Ruby Slip! (Post coming soon), and two Sierras last year (unfortunately it doesn't suit my body shape though).
Delete