
My starting point was the pattern that I made for my Little French Jacket. I wanted the same fit that I achieved with that jacket, but I did add 1mm into each of the seams to add just a little bit of extra ease. I read somewhere that when making a jacket from leather you should actually make a size bigger, so 1cm extra all round was my compromise. In making the pattern, I had to keep in mind the size of the pieces of leather that I had, and keep the pattern pieces as narrow as possible.
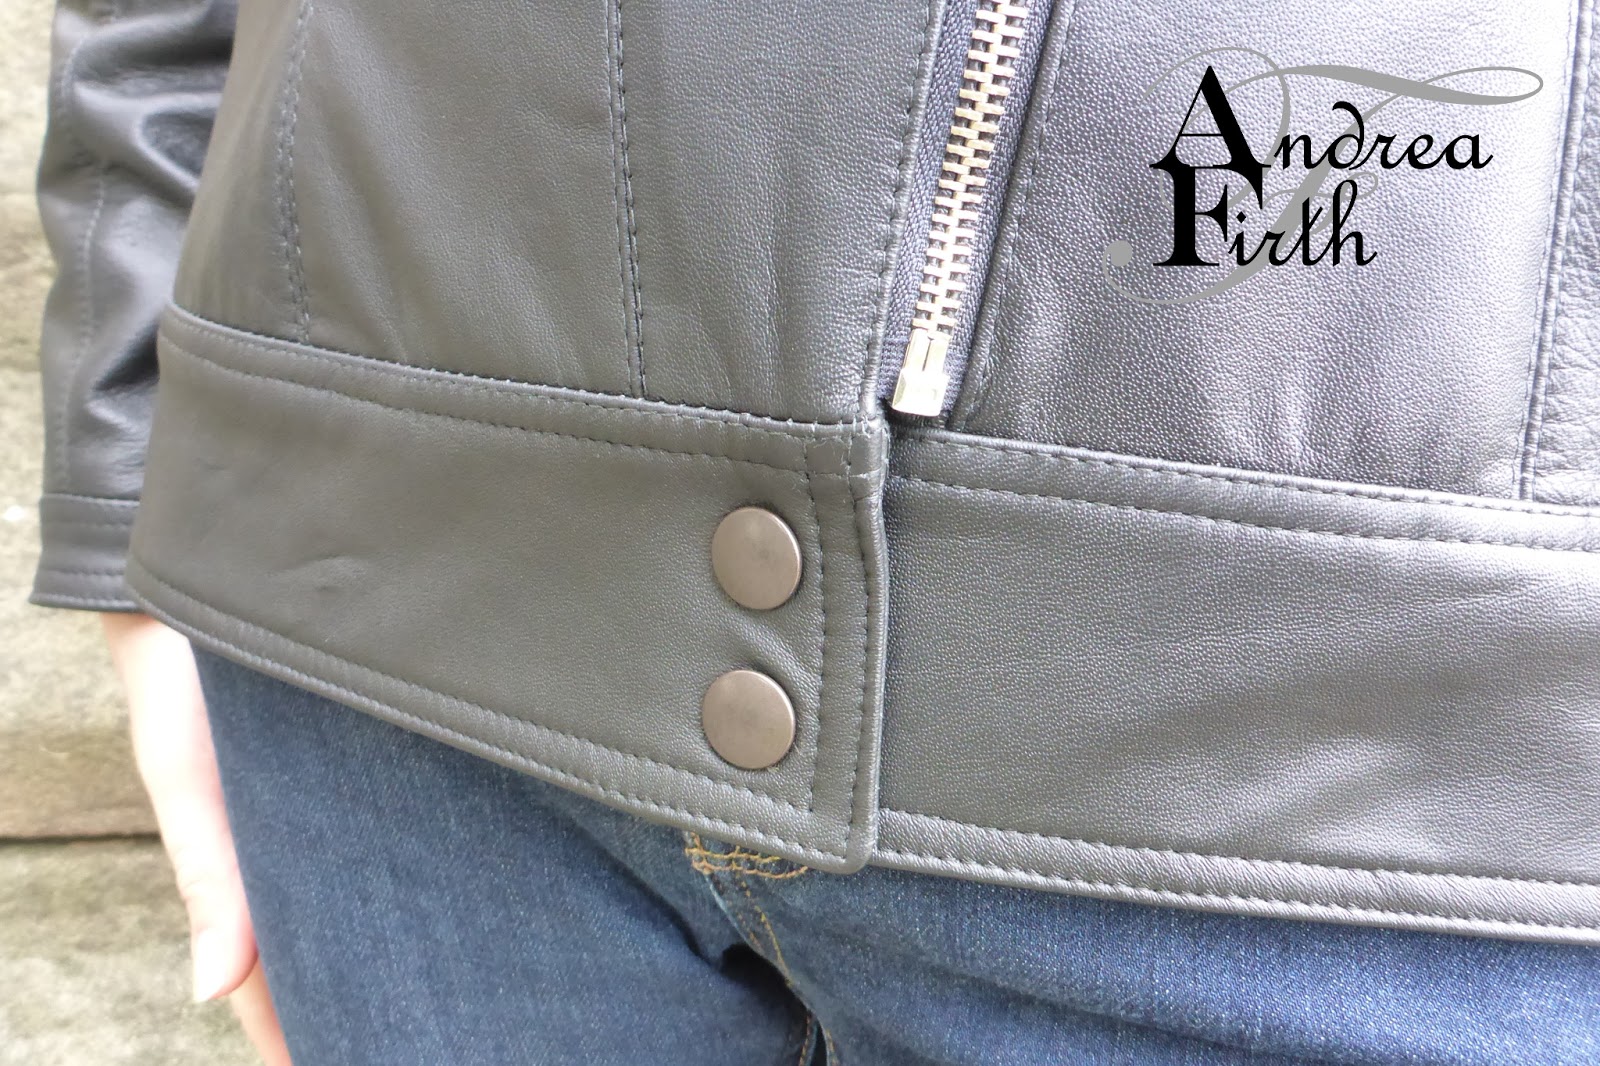
The jacket has princess seams coming from the centre of the shoulder; yokes front and back; a wide hem band, shaped at the back; two piece shaped sleeves with a cuff and zippers in the back seam and facings behind the zippers; convertible collar; zippered front; press studs at waist band.

I went without pockets in this jacket. In my previous moto jacket I added pockets in the side fronts, and find that I just don't use them. Occasionally I'll put a tissue in a pocket, but other than that, they're too small to be useful, and anything bigger adds bulk to the jacket. I had planned on putting a small pocket into the lining, but when I went to draft it I changed my mind, as the realisation hit me that I probably wouldn't use that pocket either.

A lot of the time when drafting the pattern and sewing up the jacket, I was making things up as I went along.
Example 1
I contemplated matching the seams of the sleeves with the front and back yokes, but decided that I was better off not mucking around with where I had the seams, and deliberately NOT match the seams.
Example 2
My first collar draft was for a stand collar, which is what I thought I wanted, then I made one that lay flatter, like a Pea Coat, but ultimately decided to mimic the collar on a denim jacket that I have. I spent a few days alternately wearing different jackets that I have, just to see how I like the necklines and collars.
Example 3
Sleeve length. I don't know how many times I changed the sleeves, but I'm so glad that I didn't go with my original draft for sleeves. I shortened them around 3cm from my first draft, and miraculously seemed to get the final length spot on. Not too long that they get in my way when I'm doing stuff, but not too short either.
For the lining, I used the yoke pieces from the front and back, and made front lining pieces with darts above and below bust point, and a back piece with darts to the waist, cut on the fold with a pleat for ease from the top tapering to nothing at the waist.
Leather
The leather was acquired from Reverse Garbage a few years ago (I can't even take a guess as to when it was, so at least a few years.) I started with 42 pieces of black leather, but a lot are odd shaped, narrow, or two small to cut anything from, and one of the biggest pieces has a really shiny finish, so I managed to avoid using that one altogether. There were also some branding marks to avoid.

The jacket itself is made from 34 separate pieces of leather.

Lining
I lined the jacket with a yellow/black silk that I bought in Thailand in 2002.

There's a bit of a story to how I ended up with this silk. If you've ever been to Bangkok, you would have learnt that you have to be a bit crafty when dealing with Tuk Tuk drivers. I was travelling with a friend, and the first time that we took one, we didn't know this, and asked the driver to take us somewhere that I could buy Thai silk. He drove us to an exclusive silk shop, where I felt very out of place, but also felt that I couldn't leave without buying something. I ended up buying 1 metre of a beautiful gold Thai silk that is still languishing in my stash.
On the last day in Bangkok, we had wised up a bit on the transport thing, and took a taxi to a shopping centre. The driver insisted that the centre wasn't open that day, but we got him to take us there anyway, where it was, of course, open. There was a fabric shop there where I bought a few lovely fabrics, and found some chinese silks at a much cheaper price than the Thai silk shop. I bought three colours of this silk, thinking to make pyjamas for myself and my sisters.

I did make myself a pair of summer pyjamas, but the silk is too hot for summer, so they never get worn. I never did get around to doing anything for my sisters with it.

Construction of The Jacket
I have sewn with leather before, but still did a lot of research before I started this jacket. It never hurts to remind yourself of the quirky behaviour of sewing leather. I won't include all the regular hints and tips of how to conquer leather, but I've included links to some posts at the end if you want to do some more reading. I only had a limited supply of leather, definitely not enough to re-cut if something were to go wrong. And well, sewing with leather makes holes. You only get one chance.

Before I started, I wanted to get my hands on a roller to flatten the seams. A post I found on craftsy recommended a wallpaper roller, but the ones I found were quite expensive, and I didn't like them. My wonderful husband came to the rescue and made me one. It's awesome. After much searching, I also bought glue to stick the seam allowance down. Now, I actually only used this for one of the seams, as I found that although it stuck leather quite well while remaining flexible, it didn't like sticking interfacing quite so much. After that I just decided to top stitch Every Single Seam.

Interfacing you say? Iron on interfacing? On leather? I had hesitated on whether to use interfacing. I knew that I would need something to add body to the jacket (apart from my body of course), so did some research on interfacing leather. The post that I found from Fashion Incubator suggested that home sewists do not use interfacing enough. For a jacket, the article suggest that the entire front should be interfaced, along with all armhole and neck openings. And yes, you can iron interfacing onto leather. If you do plan on ironing your leather though, I would suggest doing it before you cut anything out, and don't forget to use a pressing cloth. I had a few pieces shrink slightly when I ironed them, but thankfully, it will stretch back to shape.

Using my woven interfacing, which is quite lightweight while adding the requisite body, I interfaced all the front pieces of leather, back yoke, all cuff and waist pieces, along with the centre front pieces, around the back armholes, and collar pieces.

I used a size 16 needle, but on a few places couldn't be bothered changing my needle and used a size 9, which (on my machine at least) worked just fine too. I increased my stitch length to 4 (my regular length being 2.8). I don't own a teflon foot, and have previously tried putting cellotape under a regular foot, but it doesn't make a noticeable difference for me. To keep the leather moving properly, I do one of two things:
I use my machine tweezers to push the top fabric under the foot,

or just use my left hand to hold the fabric down and push under the sewing foot while sewing.

The part of the jacket that I was most dreading sewing was the sleeves. I was scared of having to ease the sleeve head in without the aid of gathering stitches. It turns out that this was one of the easier parts of the jacket to sew. The hardest was putting the zippers into the sleeves. Because I put leather under the zipper, I was trying to catch the lining in with my topstitching on either side of the zipper, and most of it missed, which meant I had to catch it in by hand. Oh well! It all worked out OK.

There was more hand stitching to finish off the jacket. I hand stitched in the ditch of the collar, and caught in the upper part of the waist pieces.
Special mention goes to my fellow seamstress friend who owns a stud setter. I visited her to put the studs on the front, and without going into details, I managed to put the first stud on the wrong way, so we spent longer trying to get it back off again than it took to put them all on! Don't they look great now though?
As far as stashbusting goes, I estimated the amount of leather used based on a piece 150cm wide, so my leather stash bust was 1.6m, and an additional 1.15m silk for the lining. I had the shorter zips in my stash, so the only thing I had to buy was the zipper for the front. In case you're interested, I used a 46cm long zipper.

And as for this month's stashbusting theme, I'm all ready to get onto some UNselfish sewing now. It will probably extend into July, but sewing for others is always a good thing, right?
Other posts that I read for research before starting
You Sew Girl
Sew a Straight Line
Sewing School
World of Pineapple
What a totally fabulous jacket! Well worth all the hard work.
ReplyDeleteThanks Rosemary, I'm pretty happy with it (if you can't tell)
DeleteWhat an awesome jacket! I'm so glad you used real leather, I think it makes such a difference. Thanks for the hints, but I think it will be a while before I embark on a leather jacket :)
ReplyDeleteThank you Sue. I'm hoping that by using leather it will last a long time. If I get my hands on more leather, I'm sure there'll be another leather jacket in my future
DeleteIt came out so beautifully. Well done.
ReplyDeleteI'm so glad this project is done. Thank you Melissa.
DeleteIt looks great. Like the color.
ReplyDeleteYou can't go wrong with black!
DeleteWhat a beautiful jacket. Great job!
ReplyDeleteThanks Megan
DeleteMy goodness, what a lovely jacket - it really looks very nicely made. Well worth the effort.
ReplyDeleteThank you Sarah Liz. It certainly was a mammoth effort, but such a rewarding project.
DeleteThis is impressive! I really love all the tips and I have to commend you on your zip and stud insertion and the lining up of the waist band. Such a great job and fit.
ReplyDeleteThanks so much. I do have a confession to make though. After I put the first stud in upside down, I got my husband to come to the rescue, (I literally rang him and told him to bring tools with him) and I didn't trust myself to try again, so he put the rest in for me!
DeleteAmazing jacket, it fits so well and your attention to details has made it a very special jacket which will last your for years.
ReplyDeleteThat's what I was aiming for Sharon. Thanks for your kind words.
DeleteGreat Post!!
ReplyDeleteThanks for sharing this wonderful post with us. This post is more useful for find the Jean Jacket in Bulk. Also, you will get more offers and discounts on these jeans.