
I was trying again one day to find an Australian supplier, and came across another tutorial for using ban-rol, when I happened upon a comment from an Australian saying that she was getting some in for her shop. That person was Helene from Stitch 56 in Melbourne, a company that I had not previously heard of, nor had it come up in any of my searches for ban-rol. Less than a week later, I had my ban-rol, and a client who needed 50 silk scarves hemmed! I bought 5 metres of the widest ban-rol available, 2 inches. In hindsight, I should have bought more. I mean, the postage cost me as much as the ban-rol did, and if I need more, I'll be up for even more postage!
I know that there are a lot of other tutorials out there for sewing hems with ban-rol. I know this, because I read a lot of them before I embarked on using ban-rol myself. I still had questions after reading them though, and now that I have used it for myself, I'm hoping that I can answer the questions that I had, so that you don't have to ask those same questions.
So, what exatly is ban-rol? Well, it is a stiff interfacing typically used by tailors in the waistbands of men's pants. It is made from nylon, rayon, polyester and thermoplastic resin.
I use a sew in interfacing called Shapewell in dress bodices to help them keep their shape, and before my ban-rol arrived, I had a try at using shapewell for hems. Being made from cotton, it isn't nearly as strong. But I'll show you rather than try and tell you what happened with this experiment.
Here's the hem - it looks OK at first glance

And here's what happens to the strip of shapewell. This bit was only used twice to sew hems with.


The "comb" is just tiny cotton threads, and when they get caught under a needle, it breaks off when you pull the strip out. You can see the ends of the broken threads in the back view above. When you run your fingers over the hem, you can feel the tiny threads caught in it.
While I was experimenting with hems, I also sewed up a sample of two other hems for a comparison:
Overlock, turn, press, turn, press, sew. This produces a similar result to a ban-rol hem and takes just as long to do. The corners can be a little tricky to get right though. Pressing the seam is harder to do (without burning your fingers), and if you have a delicate or see through fabric, you won't want to have the overlocked threads showing inside your hem.
 |
| Front and back of overlocked and stitched hem |
 |
| Front and back of rolled overlocked hem |
Step 1
Prepare your ban-rol. Cut to the longest length you think you will need, allowing a little extra. Along one side, trim off the very edge, cutting alongside one thread. Work out how wide you want to do your hems. I was aiming for about 5mm on mine. With the help of a pin or needle, loosen the first thread and pull it out, continue with each thread until you have an exposed "comb" the width that you want your hems.

Step 2
Place your ban-rol on the right side of your fabric, lining up the edge of the ban-rol with the edge of the fabric. If you have a frayed edge, line the ban-rol up with the solid edge. Stitch close to the edge of the comb, taking care not to catch in any other threads.

Tip: At the start and finish, sew one back stitch to avoid the thread unravelling at each end and falling out of the ban-rol

With your right hand, hold the ban-rol up out of the way to avoid having it catch on your fabric as you sew.
Step 3
At your ironing board, flip the ban-rol over so that the comb edge is now facing back towards the main piece of your fabric. Iron the fabric flat, being sure to not pull too tightly, to avoid pulling the threads out of the ban-rol.
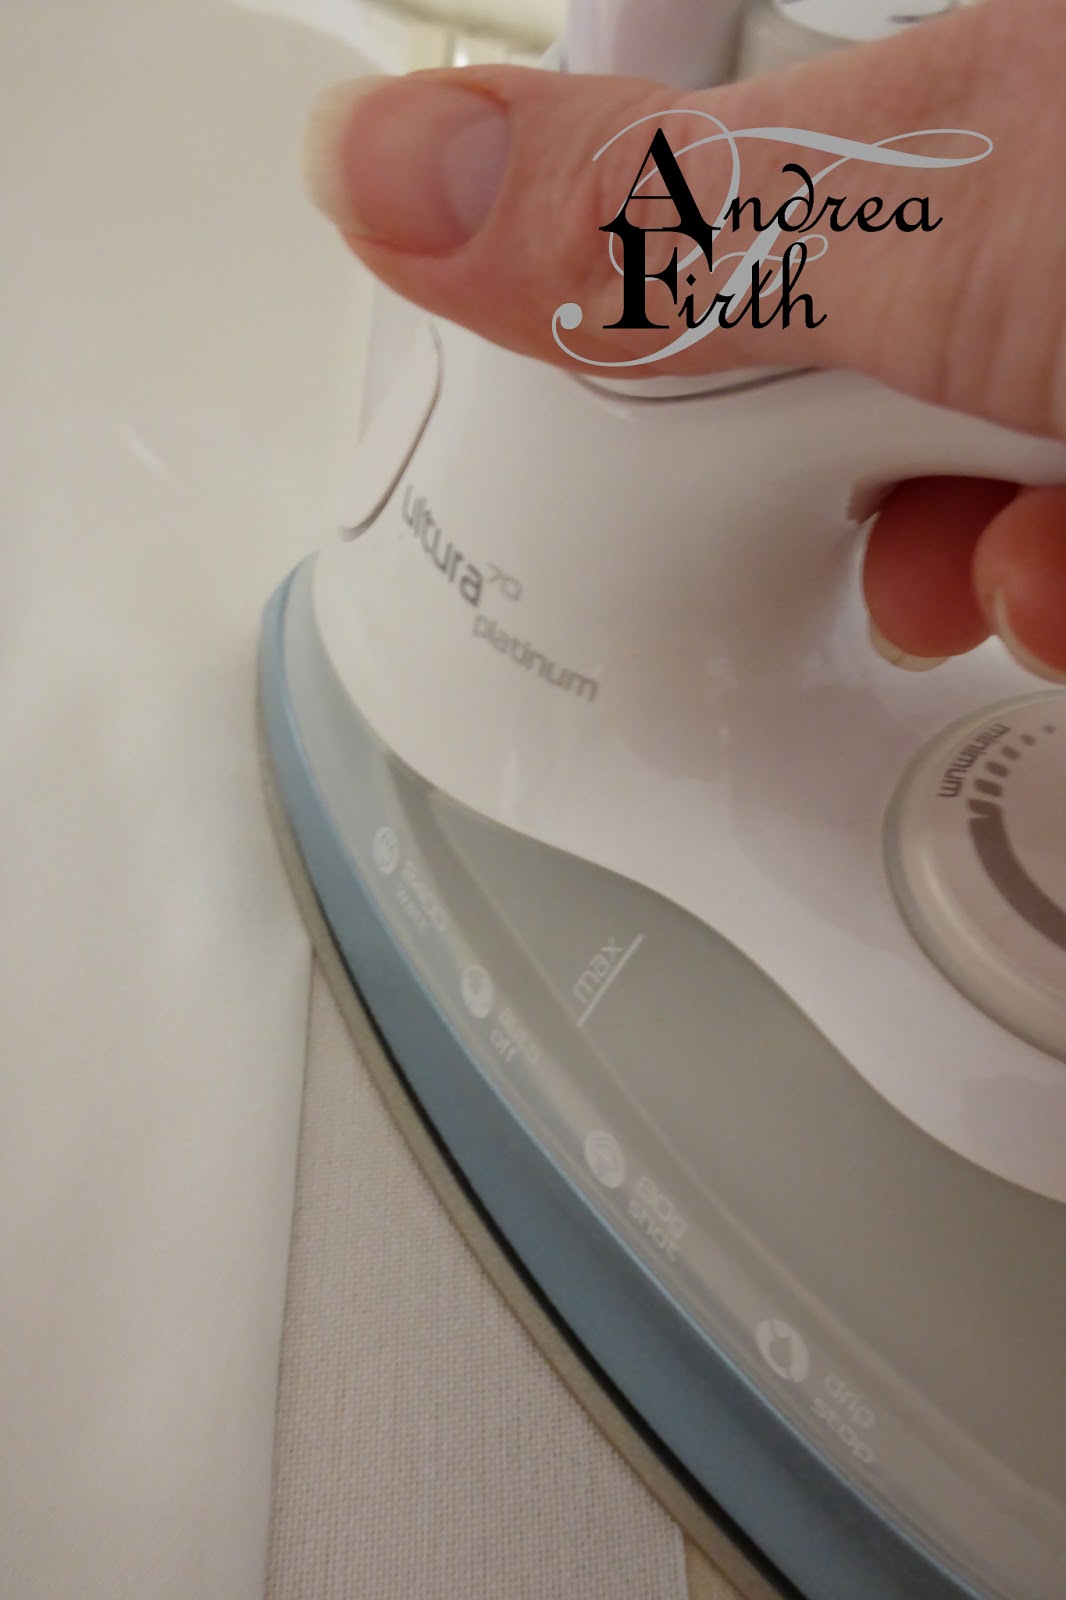
Now turn it over, and fold the ban-rol back so that the comb is tucked into your hem. The edge of the comb will now be up against the edge of the fabric. Press again.

Tip: Push the ban-rol into the hem with your thumb as you iron
Step 4
Back at the sewing machine, stitch close to your folded edge.

Tip: As you sew, use your left hand to pull your fabric to the left to keep it tight against the ban-rol.
Step 5
Now is the fun part - pulling out the ban-rol and revealing your beautiful hem.

Go carefully here. If you have accidentally stitched over the threads, it will pull on the thread and unravel another row. Don't think it will never happen to you. We're all human. You will be able to feel if you have done this and avoid damaging your ban-rol if you go slow and steady. If you feel resistance when removing the ban-rol, check to see if you have caught a thread.

If you're not so lucky and you've pulled a thread right out of the comb, just trim it back at each end, and take note of where it is to avoid it next time.
Step 6
Press your beautiful new hem

Look how beautifully this method does corners!
Troubleshooting.
The comb edge of the ban-rol is basically a lot of little spikes of plastic, similar to that used in plastic boning, but on a much smaller scale. It catches on fine fabrics, and usually whatever you happen to be wearing, even the carpet! As much as possible, try to keep this edge away from the fabric that you are hemming. For my edges, rather than spend hours cutting fabric, I ripped it to the lengths that I needed, which left a silky raw edge. Despite trimming away stray edges, they will still get caught in the edge of the comb, meaning there will be more silky threads to clean up.
Wear and tear on ban-rol.
The other big worry was how much of the next thread had been cut off due to getting carried away with Step 5 above. The area of the ban-rol next to a cut thread is more susceptible to pulling out when you sewing your next hem. It is more likely to get caught on the end where you have cut it, and will then unravel more. If you have marked where the thread is cut, you'll be able to take more care when sewing near this area, and also when pulling the ban-rol free of the hem. If you don't notice a caught thread in time, the next thread just pulls away, and you have to cut out the offending piece. Lucky for me, it was only ever the next thread, and not the one after that that I had issues with. With every hem, the ban-rol is getting weaker, and I was just hoping that it would last until the end of the scarves before I could cut the edge off and start again.
I cut two lengths for the scarves I hemmed, so that I would have one for the long edge, and a much more manageable length for the short sides, halving the number of trips between sewing machine and ironing board. Both suffered equally from so much use, but with the shorter one, being easier to manage, there wasn't as much damage to the threads.
Here's what my ban-rol looked like after 100 uses.

Not nearly as pristine as when I started. Apart from some warping from being ironed so much, you can see that some of the "fingers" in the comb look to have started fraying.

That's from where the needle kept hitting them. Being plastic, the needle will mostly slide off, but occasionally the needle would catch a little. You can also see how the fingers seem to be grouping together in clusters, according to how they grouped together between stitches.
 |
| Trimming the comb edge off |
So this is what it looks like now!
 |
| Ready to go again |
Just like new. FYI, with my ban-rol, I pulled seven threads for a 5mm comb (10mm seam).
After completing this exercise with hems, I can highly recommend using ban-rol for small hems, if you can find some. What has everyone else used ban-rol for?
My goodness, what determination and patience you have to do these hems. They look fantastic.
ReplyDeleteThanks Sarah Liz. It certainly did take a lot of patience. But it was all worth it!
DeleteGreat tutorial. It sounds like a good thing to have in the sewing room. I had read about this before, but not really understood how it worked until now. Thanks!
ReplyDeleteGlad I could shed some light on it's uses (and usefulness) for you Megan.
DeleteWow that is an amazing product and had never heard about it before. Thank you for all the great information and if I need some I now know who stocks it in Australia.
ReplyDeleteI love it when I learn so many new things from my fellow stashbusters! It was such a pain to find, I thought it would be useful to tell other Aussies where you can buy it from.
DeleteYou have answered every question I have about this technique! Thank you. I'm currently weighing the product vs. shipping and wondering how many opportunities I'll have to use this method to see if it's worth it. I have the same problem with finding this locally available in North Eastern USA. The results are beautiful, no doubt.
ReplyDeleteI'm terribly sad....Stitch 56 have closed down! Even their FB page is empty!!!
ReplyDeleteYour tutorial is brilliant, but where do I now find this product I wonder?
ReplyDeleteThank you for a great tutorial. I can no longer find stitch56 as a supplier but SewingGem.com.AU is a local Australian stockist.
ReplyDelete